MT4/5 SSFx - Hedge Manager EA Settings Guide
Published onWelcome to the detailed setup guide for our powerful MT5 EA! This guide covers each setting you’ll find in the EA, with tips on how to optimize them for efficient and hassle-free trade management. Attached images below will illustrate each setting group, helping you understand the setup better.
This EA is designed to simplify your trading process by managing risk and ensuring balanced positions. It’s not a trading strategy and doesn’t guarantee profits; rather, it serves as a smart management tool that helps close winning trades and use profits to manage losing positions. For more in-depth optimization techniques, make sure to check out our upcoming videos and posts, which will dive into real-world use cases and show exactly how these settings affect the EA’s performance.
If you need any assistance with setup, feel free to reach out! Let’s take a closer look at each setting and its impact.
Contents
- Global Settings
- UI Panel Settings
- Important Notes
- Licensing Options and Support
Global Settings
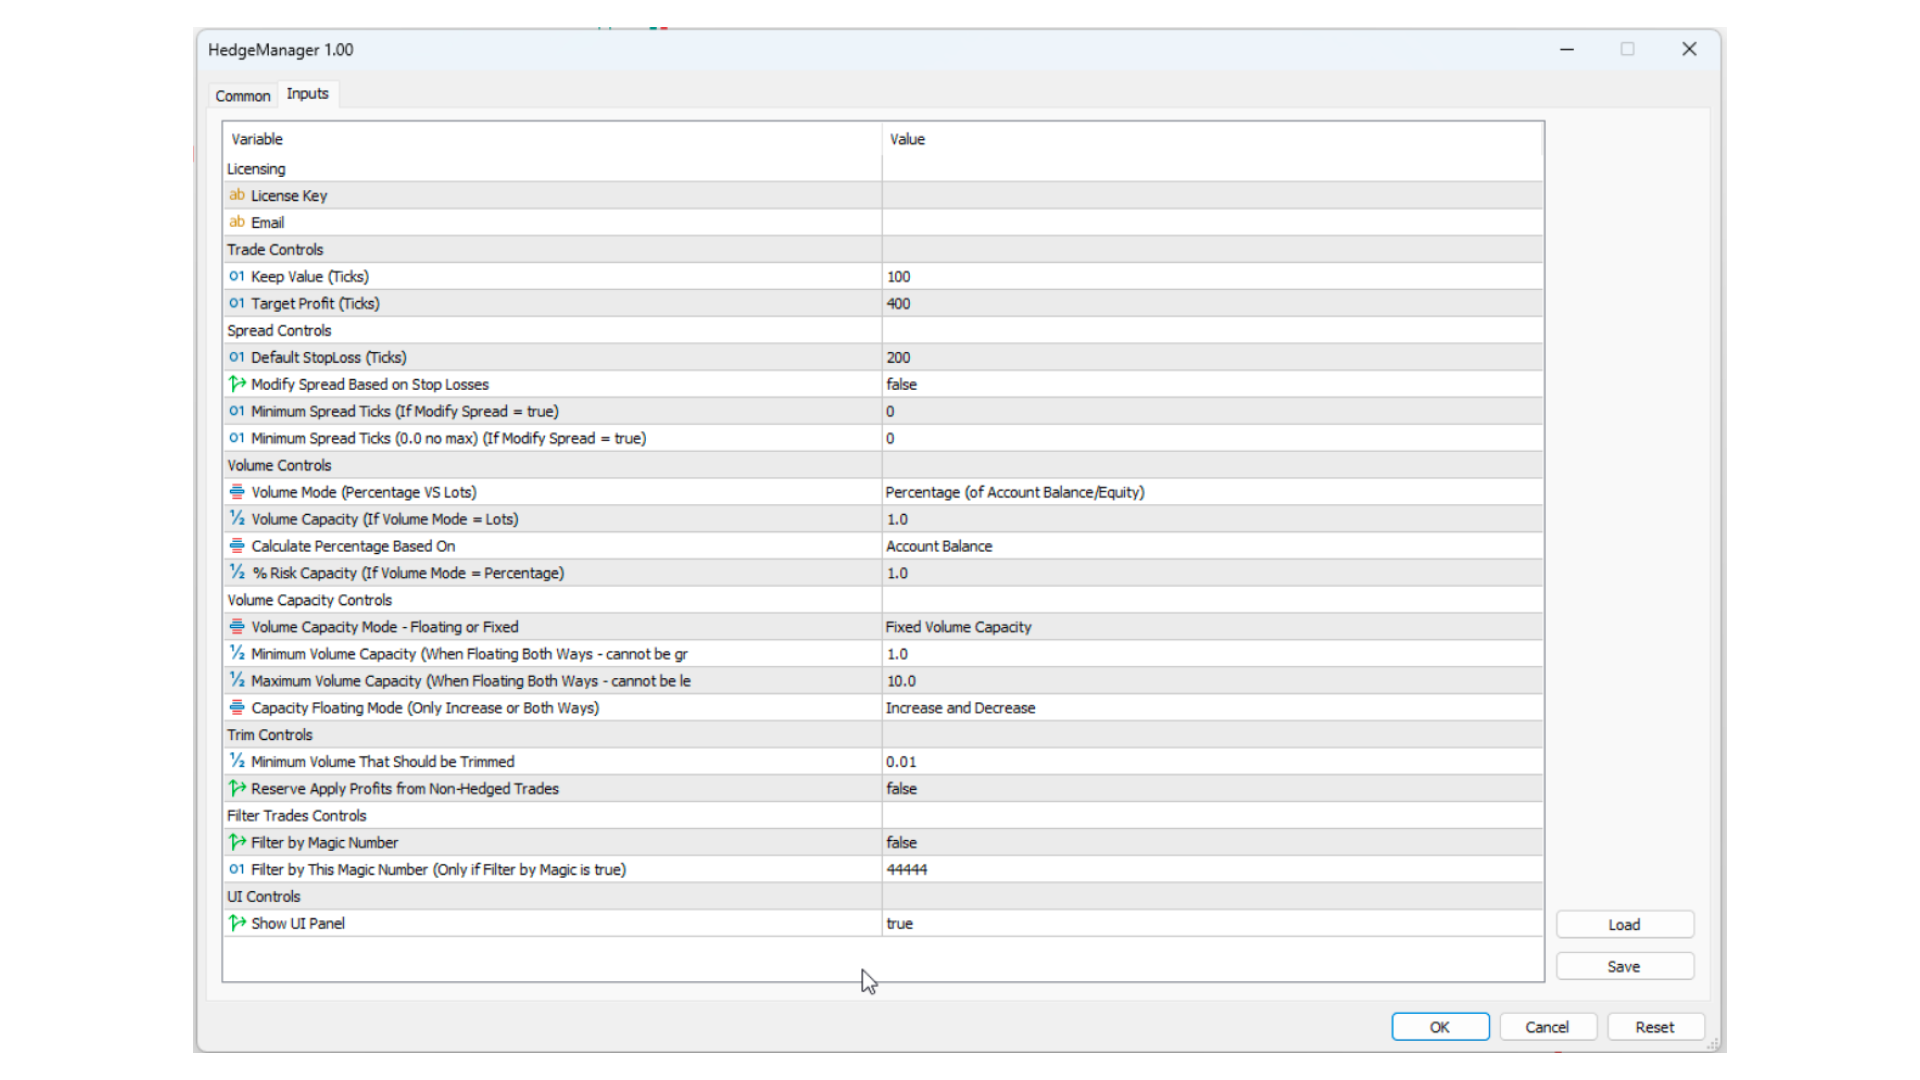
The settings described below correspond to those on the UI. The Show UI Panel corresponds to whether the Dashboard/UI should be displayed on the chart. The dashboard allows you to dynamically change settings and update any parameters you see fit to control how the manager hedges your trades.
Please note that all the settings described below can be set globally without the need of using the UI. However, the UI gives you the advantage of being able to dynamically change your parameters and see the summary of the long and short volumes plus any reserve volume that will be used to close current/future losing trades. Additionally, the EA automatically saves any settings you change on the UI. As such, even when you close your terminal and come back later, all you need to do is launch it and it will be back to how you left it.Caveat - If any trades are closed or modified when the EA was closed, certain parameters might change based on how the EA “reads” the market the next time it is turned on. As such, if any settings such as the spread or capacity are changing dynamically, these might be edited. If you wish for your settings to remain the same when shutting down, please turn all dynamic settings to fixed ones before shutting down since on first launch, the EA will read the market and your existing trades and modify all dynamic parameters.
UI Panel Settings
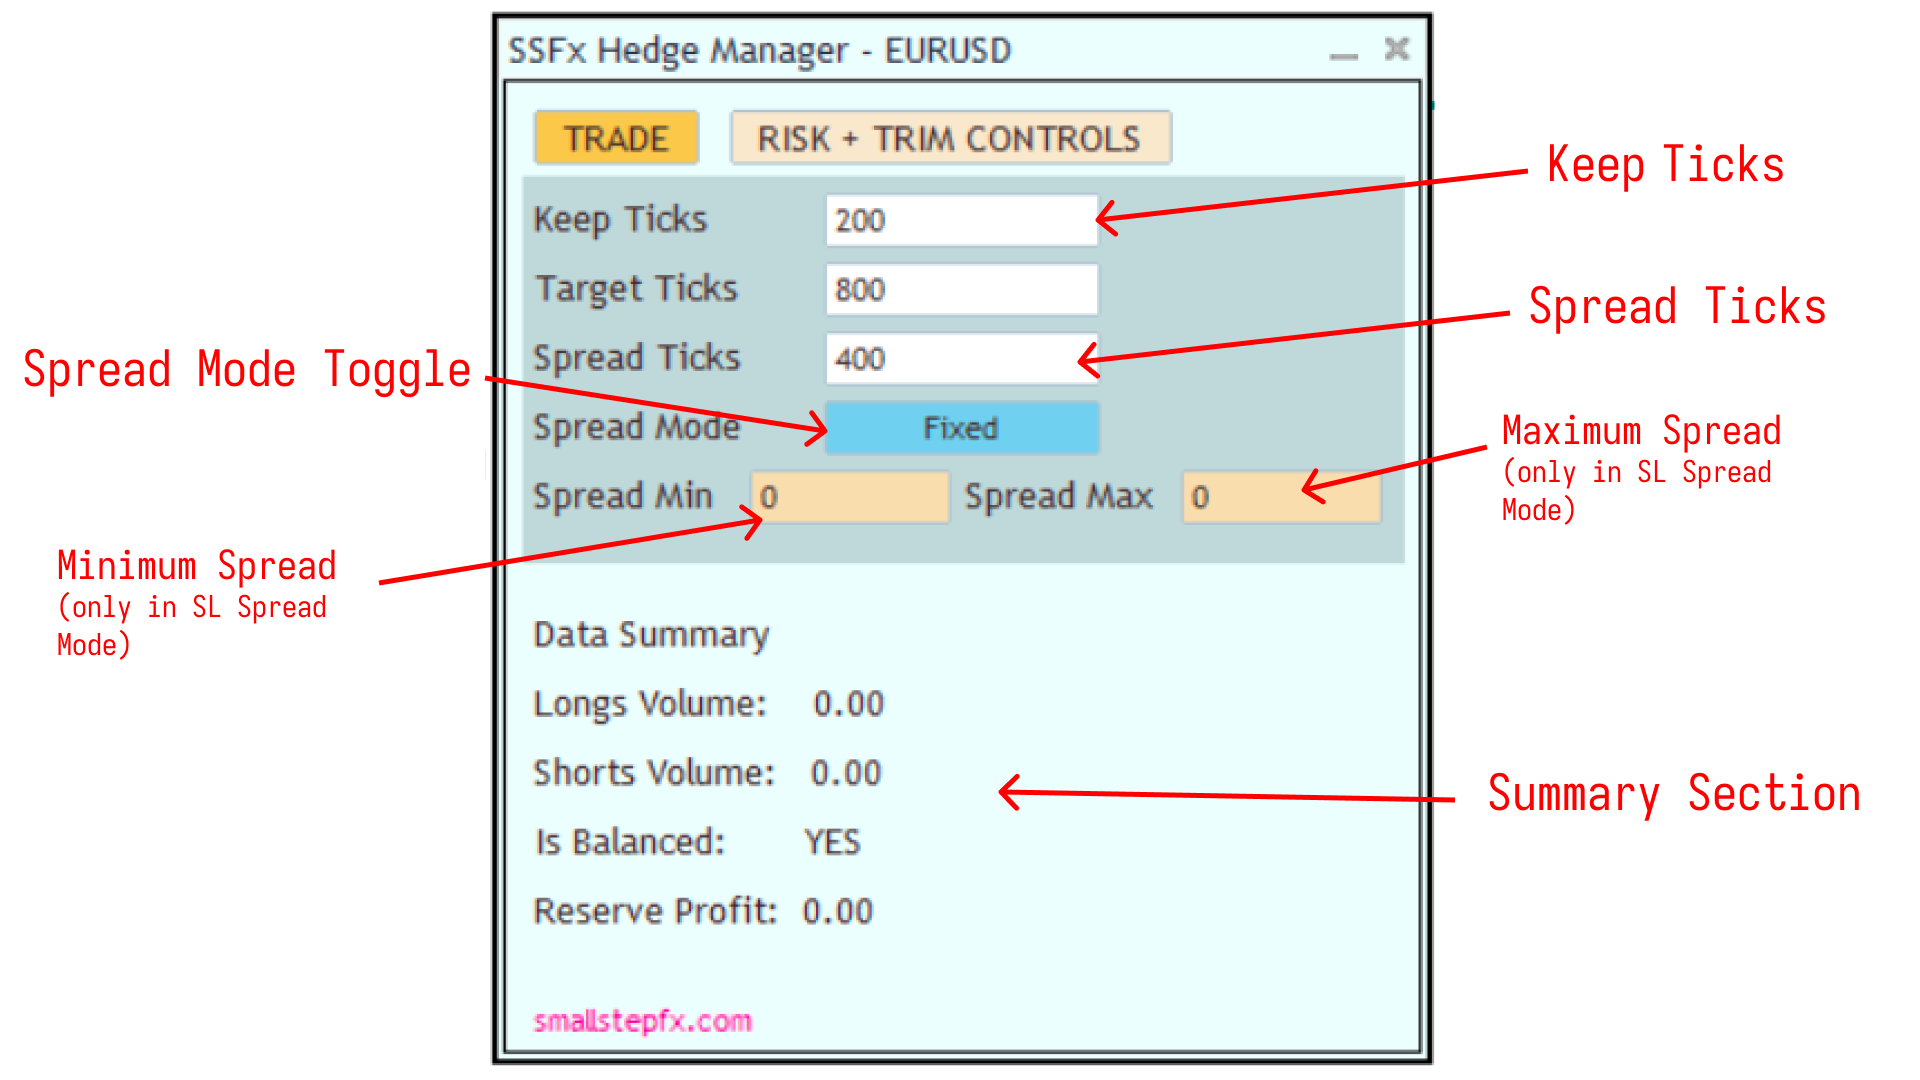
1. Profit and Spread Management Settings
Keep Ticks
Define the number of ticks (or pips) from a winning trade that you want to keep as profit. This is useful for setting aside a portion of gains while using the remaining profit to close losing trades. For example, if you have a 40-tick profit, you could keep 10 ticks and allocate the remaining 30 ticks toward reducing a losing position.
Target Ticks
This is the target tick count for closing profitable trades. Once reached, the EA will use the profit to assist in managing other trades as per your “Keep Ticks” setting. Optimizing this setting ensures you are booking gains at the right time while also reserving potential profits for trade management.
Spread Ticks
Spread Ticks defines the hedge initiation point, similar to a stop-loss distance in non-hedging strategies. This determines the tick distance after which the EA will hedge the position to maintain balance. Optimizing this helps you set an effective range for trade hedging.
Spread Mode
Choose between Fixed and SL-Based modes. Fixed mode keeps the Spread Ticks constant, while SL-Based mode adapts it based on your most recent trade’s stop loss, ensuring the spread changes according to risk levels. Use Fixed mode for steady control and SL-Based for dynamic, stop-loss-dependent spread.
Min and Max Spread
When using SL-Based Spread Mode, set minimum and maximum values here to limit the spread range even if the stop loss adjusts dynamically. This ensures the spread does not go below or above specific levels, providing more control over hedging distances.
Refer to the attached image below for a visual of these settings.
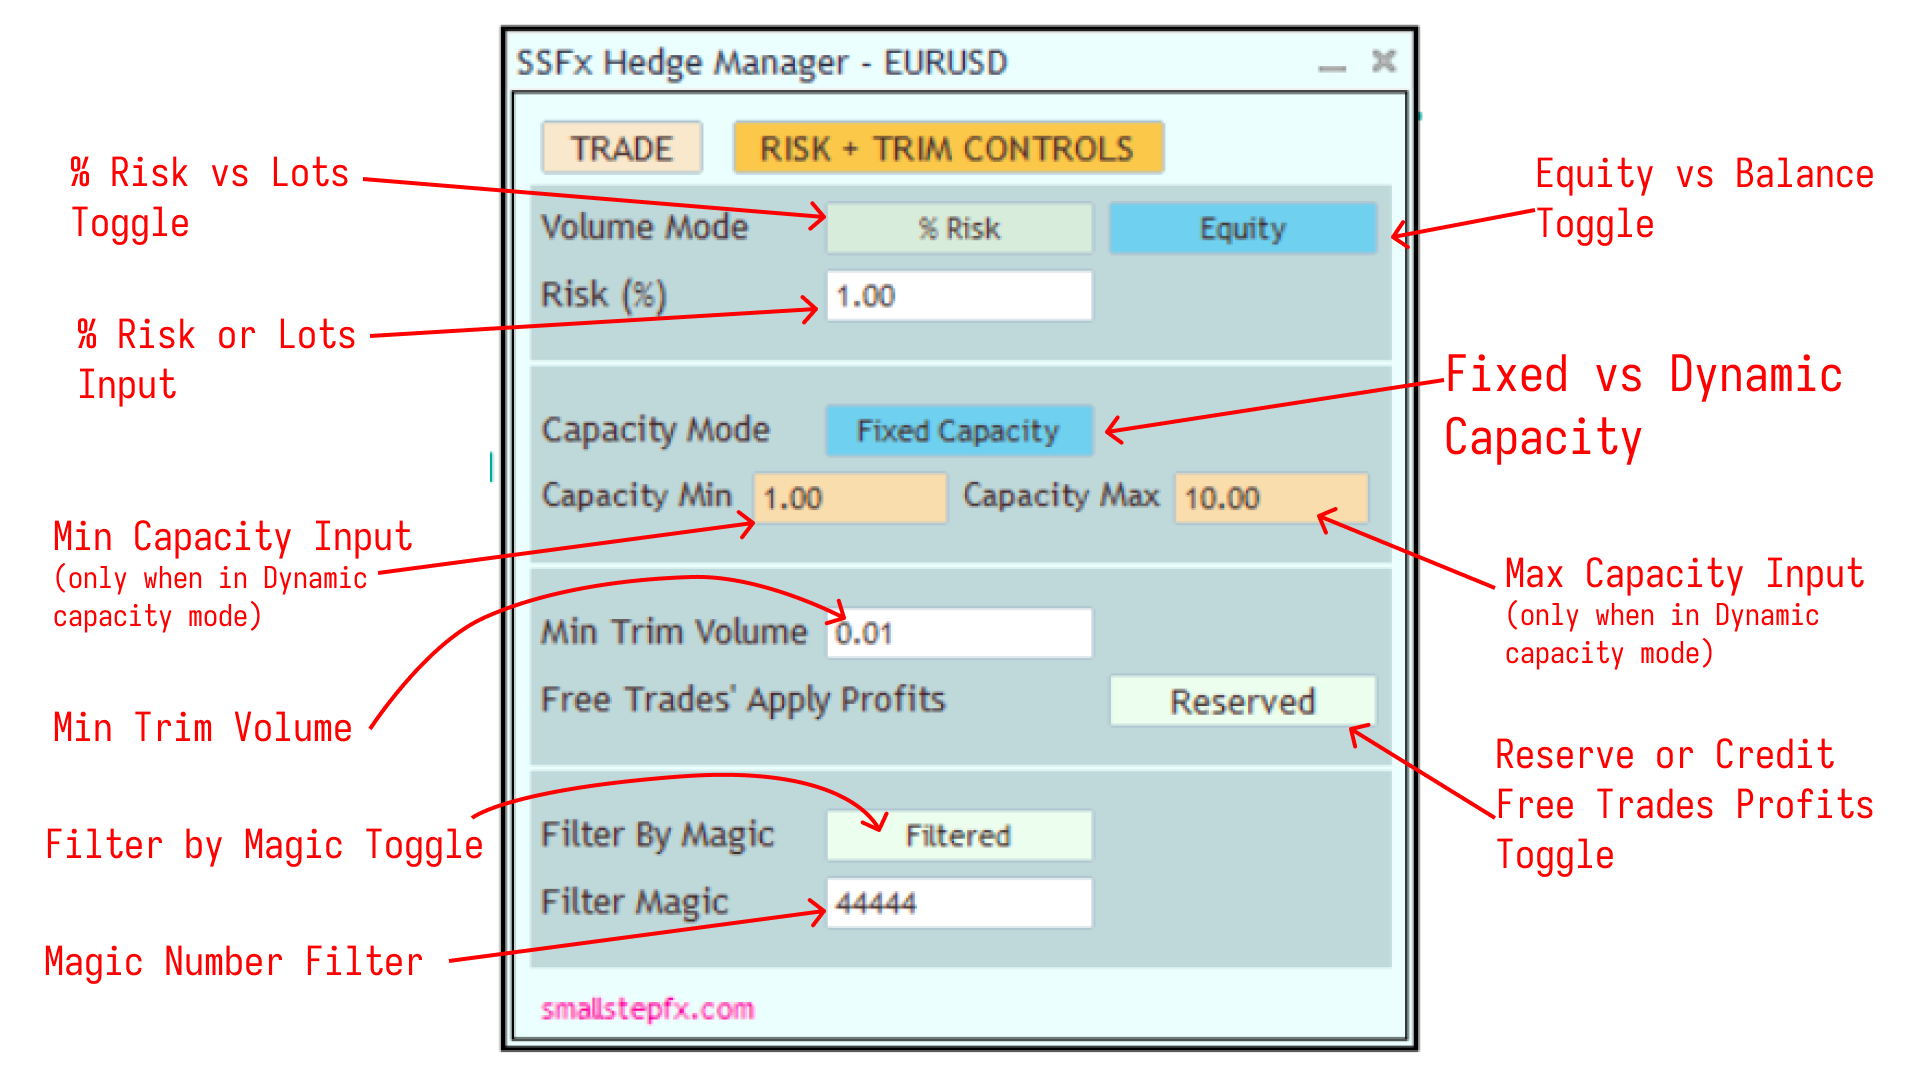
2. Volume, Capacity Control, Trim, and Trade Selection Settings
Volume Mode
Choose between % Risk or Fixed Lot Size. With % Risk, you can base the risk on either your account balance or equity, dynamically adjusting the volume to your account size. The Fixed Lot Size option is great if you prefer a consistent, non-changing volume per direction. Essentially, this value defines the maximum volume either direction (buy or sell) should have.
An example of this would be if you have this value set to 1 Lot, it will limit your Buy trades to a maximum of 1 Lot while keeping your sell trades to a maximum of 1 Lot. As such, your total lot size in the market will never be more than 2 Lots. Think of this as the maximum Capacity on either direction.
Capacity Mode
Capacity Mode allows you to define whether to fix a side/direction’s maximum lot size or adjust dynamically. Fixed capacity keeps the volume constant, while Dynamic mode adjusts it based on any new trades found in the market. Essentially, if you add a trade and this is set to dynamic, your total capacity volume will also change. This flexibility ensures the EA adapts to both low- and high-volatility scenarios.
Example using % Risk Mode When using percentage risk mode, the EA will automatically adjust your % Risk amount based on any trades you add to the market. In this case, if you send in a new trade and it results in your capacity being more or less than the set % risk (given the spread), it adjusts the percentage. Example of this is when you are risking 1% of your balance and you add a trade that accounts for 0.5% of your balance. When in Dynamic Capacity mode, this automatically adjusts your new % Risk to 1.5% of your balance.Example using Lot Size Mode When using the lot size mode, the EA automatically adjusts your capacity volume on either side based on whether you add new trades to the market or not. So if you add an order or a trade to the market, it modifies your capacity to the new volume. Otherwise, if Capacity is fixed, the value you set at the Volume Mode is used as the Maximum Capacity, regardless of any trades that you open yourself.
Capacity Floating Mode (Only in Floating Capacity Mode)
In certain situations, you might want your capacity volume to only increase or increase and decrease. This setting allows you to define what happens when for instance, your capacity is floating, and you have added a trade. If you close trades and the EA can still close the Min Trim Volume, it can reduce your overall exposure in the market by modifying the total available capacity.
This setting is great when you want to reduce your exposure. Once you set your Min and Max Capacity lots, the EA will gradually close out open trades that are in profit until it gets to the Min Capacity (When in Floating Both Ways Mode). And if you happen to want to increase your exposure, you can set it to Float Upwards so when you add a trade, it Dynamically increases your Capacity up to the Max Capacity.
In the future, a Floating Downloads Mode Will be Added which will gradually reduce your volume up to the Min Capacity and never increase it. Still figuring out how this would work in line with the Capacity Mode Setting. However, for now, you can achieve it by setting the Maximum Capacity to your Minimum which prevents the EA from Increasing your Capacity when Floating Bothways and then setting your desired Capacity as the Min Capacity. Hope this helps 😉
Min and Max Capacity
When in Dynamic mode, these limits define the minimum and maximum lot sizes. This added range control sets limits when in Dynamic Capacity Mode to prevent over or underexposure in the market.
Min Trim Volume
The minimum amount that should be closed from a losing position if profits are available from a winning position. The EA will reserve profits if they don’t meet this threshold until they accumulate enough to close a portion of a losing trade.
Free Trades’ Apply Profits
This option allows you to choose how profits from non-hedged trades are applied. Select “Reserved” to save these profits for trimming future trades, or “Credited” to add them directly to your balance.
Filter by Magic
If you wish to manage only specific trades, toggle this setting to “Filtered” to filter trades based on their magic number. This lets you control which trades the EA will manage, ensuring it doesn’t interfere with other strategies on the same symbol.
Filter Magic Number
Specify the magic number for trades you want the EA to manage. When “Filter by Magic” is enabled, the EA will only handle trades with this magic number, giving you fine-grained control over which trades the EA should actively manage.
An image attached below shows how these settings appear in the EA.
Important Notes
- Single-Symbol Management: This EA manages trades only on the symbol attached to the chart. To manage additional symbols, open a new chart and attach the EA to each.
- Strategy Tester Compatibility: Because this EA is strictly for managing trades, it won’t perform in the strategy tester unless you find an approach to add active trades which can then be managed using this EA. Essentially, the EA doesn’t initiate trades but automates trade management.
- Account Requirements: Ensure your account allows hedging for the EA to operate correctly.
Licensing Options and Support
Each license is a one-time purchase, with all future updates included. If you wish to switch accounts, each license is valid for two accounts. To reset account connections, you can visit this page for easy account management. Remember, there’s a 7-day money-back guarantee, so you can test the EA risk-free.
Need a license? You can get one here.
Learn More
For a more in-depth walkthrough, watch our video showcasing the EA in action, where we demonstrate how each setting impacts the EA’s performance. We’ll also cover different optimization methods and use cases in upcoming posts to help you get the most out of your EA.
If you experience any issues or bugs, please report them here so we can address them quickly. Remember, this EA is designed to make your trade management easier, automatically closing winning trades and balancing positions. It doesn’t guarantee profits, but it does ensure your trades are well-managed and hedging is automated.
Stay tuned for more tips, and feel free to reach out with any questions!


